
A sprinkle of mini charm magic + Chenille-It... The post Adding Chenille-It to the Mini Charmed Butterfly Block appeared first on Lella Boutique.

I’m back after a little creative recharge, arriving home to find a box of Wild Honey precuts on my porch. Yay! Now that Wild Honey is arriving to shops, I wanted to create a landing spot with info about adding Chenille-It to the Mini Charmed butterfly block pattern… Back in June I filmed a video with Moda about this process:
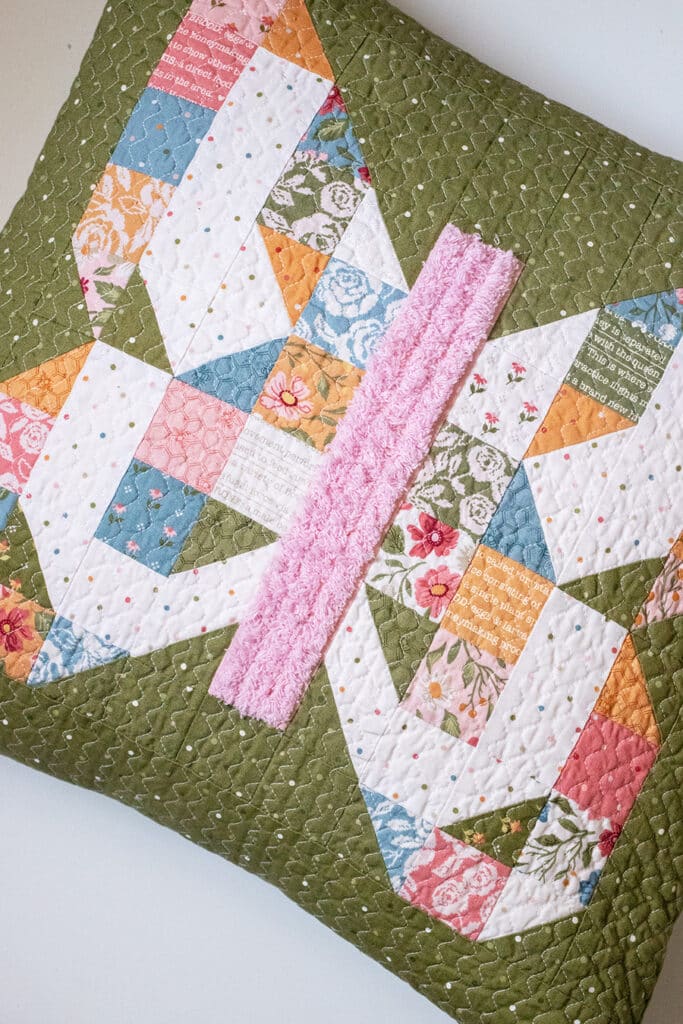
Adding Chenille-It is always a fun way to add a little pop of soft texture to a project. I thought the pink “worm” element of the block was the perfect spot and it’s so easy since we’re only adding it to one part. There are actually a couple ways you could go about adding Chenille-It to a pieced block.
- You could just top-stitch onto the block AFTER it’s pieced. This is a similar method to what is done to to embellish a panel – which you can read more about here. You just want to make sure you start and end each row with backstitching to really reinforce everything.
- The other option is to stitch it onto the individual pink rectangle unit BEFORE piecing the block together. I prefer this method because I like knowing the ends are securely stitched into the block with zero chance of coming off. (This is what I demo in the video.) What you want to keep in mind when stitching the Chenille-It onto the rectangle is to leave 1/4″ at the sides (where the fraying happens) to allow for the 1/4″ seam allowance.

Before we get to the piecing visual, I want to mention a little about the materials. I used the “pale pink” Chenille-It color in 3/8″ width found here on the Chenille-It website. This 3/8″ width was perfect for this project as (3) rows fit pretty perfectly! Also to note – I have laid double-layers of the Chenille-It in each row. (I cut (6) 10″ segments total.) This translates approx. 1-3/4 yards of the Chenille-It. Here’s a quick list of what you need for this project:
Materials Needed
- (1) mini charm pack (38 squares 2-1/2″ x 2-1/2″)
- (1) scrap 4″ x 10″ pink accent print
- (1) fat eighth white (wing accent) print
- (1) fat quarter background print
- 20″ x 20″ batting
+ PILLOW FINISHING MATERIALS
- 1/2 yard pillow backing print
- 18″ x 18″ pillow form
OR MINI QUILT FINISHING MATERIALS
- 5/8 yard backing print
- (1) fat quarter binding print
+ OPTIONAL CHENILLE-IT EMBELLISHMENT
- 1-3/4 yards Chenille It “pale pink” (3/8″ wide)
Now here’s a breakdown of what it looks like to add the Chenille-It to the “worm” rectangle BEFORE piecing it into its column. (When looking at pattern instructions, we’re at Step #3 and this would be what it looks like to stitch Column #5 together.)
It starts with the K/C/L fabric pieces arranged in a column > (3) rows of Chenille-It (double layers) arranged onto the pink fabric rectangle, leaving 1/4″ at the sides > stitching down the center of each Chenille-It row > Sewing the fabric units into their column.
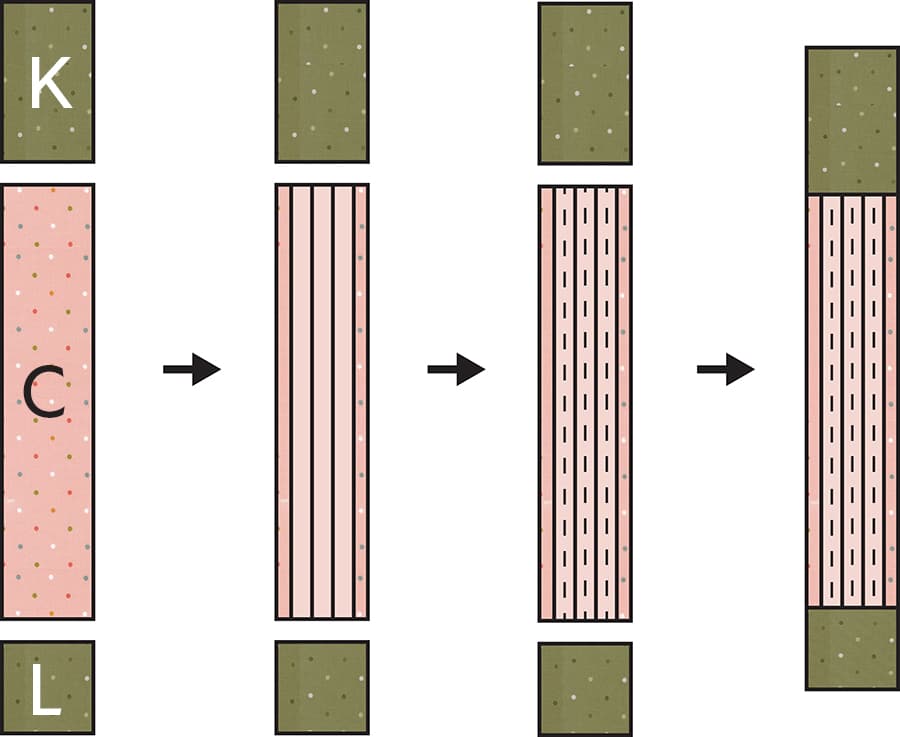
Next, you just continue following pattern instructions to sew the columns together in Step #4.
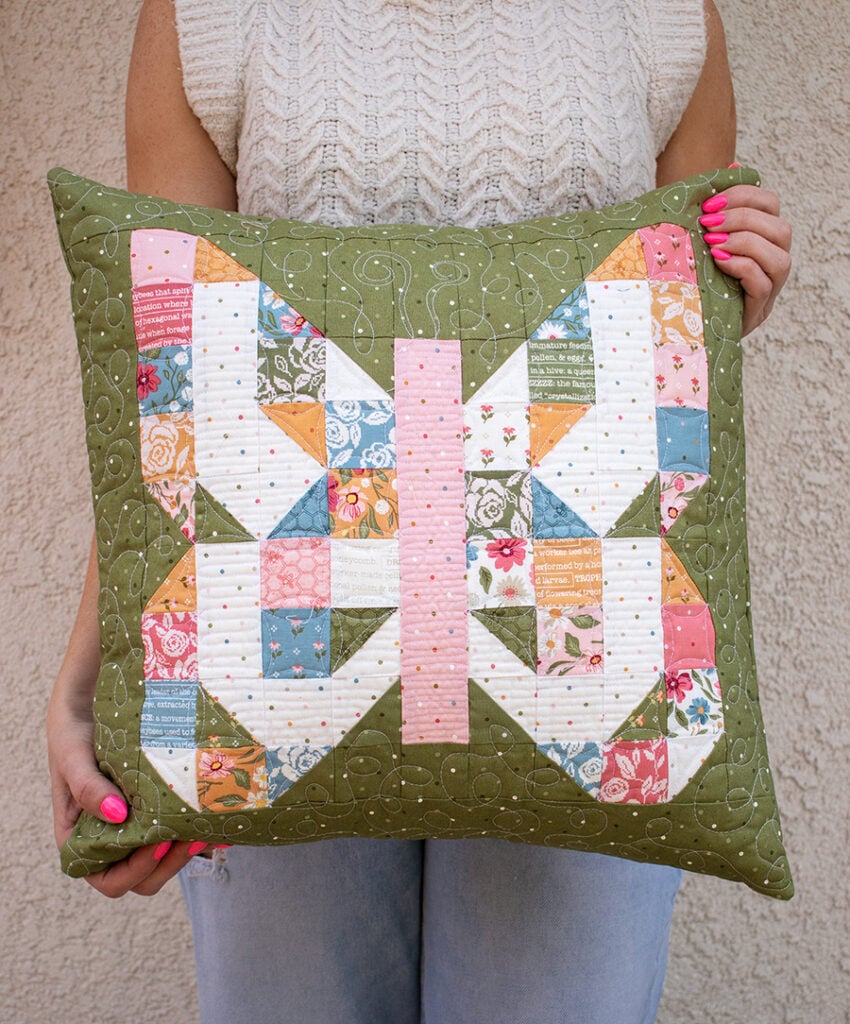
Once the project is finished, you will want to comb over the Chenille-It with their brush tool (I’ve also heard a plastic serrated knife works but have never tried it). Wash and dry the project and it will fluff up. Pretty fun, right? Be careful, you might want to start adding Chenille-It to everything  This is what it looks like without. I think it’s pretty cute both ways. Which is your fave?
Like this post? Drop your email in the box below to get new post notifications via email.
The post Adding Chenille-It to the Mini Charmed Butterfly Block appeared first on Lella Boutique.