
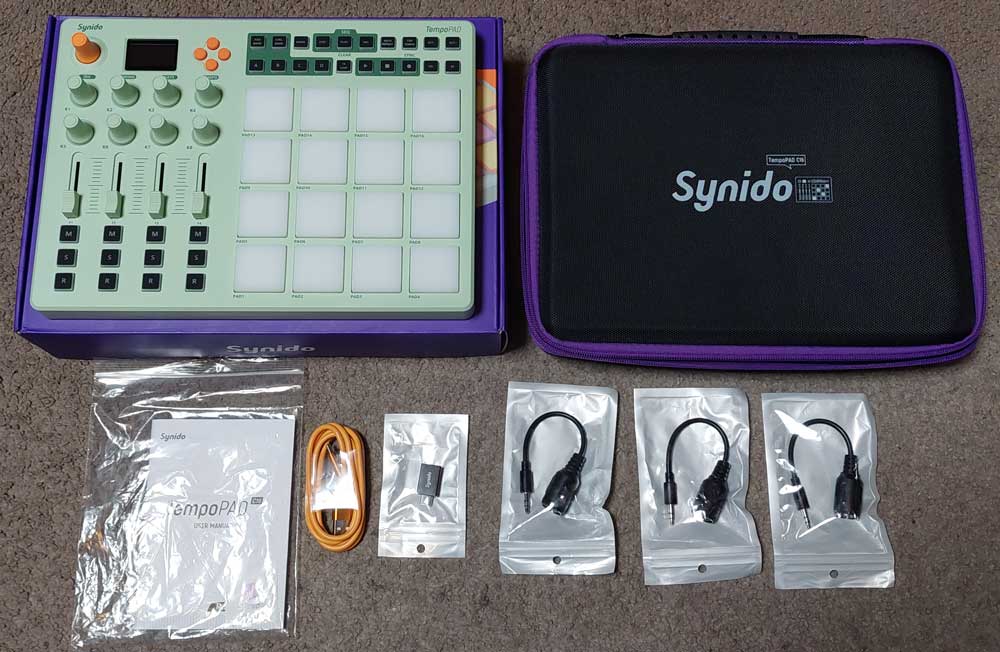
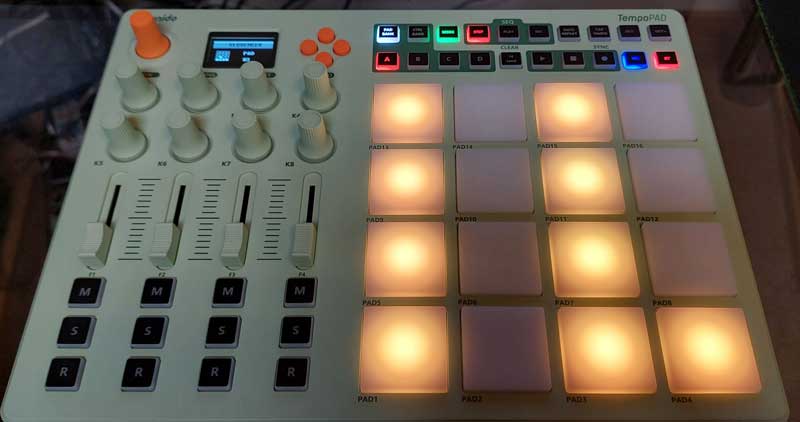
The Synido TempoPAD C16 is a versatile and compact wireless MIDI controller.
After I spent time reviewing the TempoKEY W25, I was keen to try out a MIDI controller focused on pads instead of keys. Fortunately, Synido was happy to send me the TempoPAD C16 to try out.
In this review, I’ll go through each of the main features to give you an idea of whether this MIDI controller is right for you.
If you want to learn more about MIDI controllers, check out my Ultimate Guide to MIDI Controllers here.
Synido TempoPAD C16 Features
Here are the main features of the Synido TempoPAD C16:
- Wireless Bluetooth connection
- USB-C and MIDI In/Out/Thru jacks
- Built-in 3000mAh rechargeable battery
- 16 backlit pads with different velocity-sensitive profiles
- OLED screen
- 8 assignable infinite knobs
- 4 assignable faders
- 12 assignable M S R buttons
- Keyboard/custom pad modes
- 4x banks for pads/knobs/faders/buttons
- Transport buttons (Stop, Play, Record)
- Octave and transpose up/down buttons
- Step sequencer with 16-track memory banks
The TempoPAD C16 also comes with a high-quality travel case, USB-C cable, USB-A to USB-C OTG adapter, and 3x 3.5 to 5-pin MIDI Adapters.
Check out the price and details of the Synido TempoPAD C16 on Amazon here.
Synido TempoPAD C16 Ease of Use
The Synido TempoPAD C16 can be used on PC, Mac, and mobile devices either by connecting the supplied USB-C cable or wirelessly using Bluetooth.
Note: I have only tested the TempoPAD C16 on a PC running Windows 11.
Using Bluetooth
The Bluetooth wireless connection works in the same way as it did when I tested the TempoKEY W25, so I knew what to expect.
Wireless on PC running Windows 11 isn’t as straightforward as it is for Mac or mobile devices, but once the initial setup is done, connecting is straightforward.
To set up the wireless connection, Windows users need to install and open two third-party programs: MIDIberry and LoopMIDI.
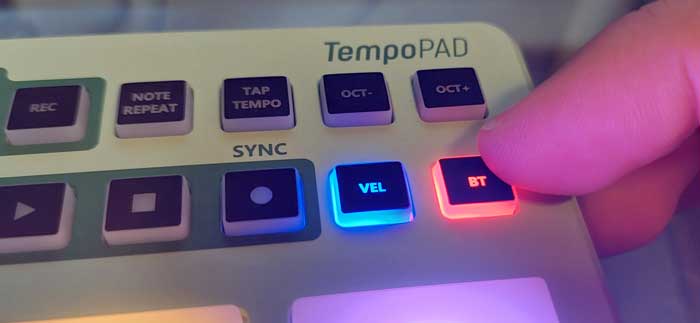
Once you install those programs, you switch the TempoPAD C16 on and press the BT button (it will light up red for pairing mode).
Next, turn on your PC’s Bluetooth and pair the device.
Once paired, you open both loopMIDI and MIDIberry programs and select the Synido TempoPAD C16 in MIDIberry’s input list and LoopMIDI Port in the output list.
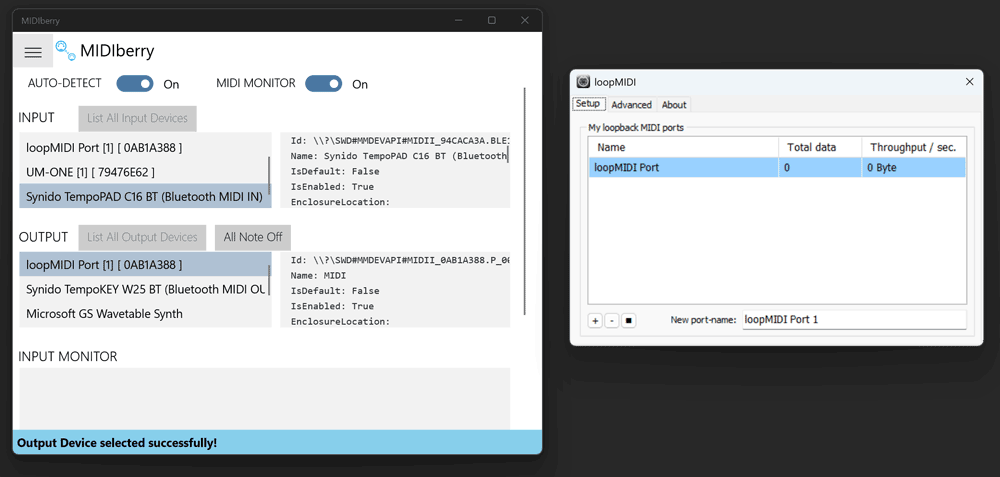
Then you can open your DAW and select “LoopMIDI Port†as the input and output devices.
You need to do this every time (except for pairing, which is a one-time step) you want to use the TempoPAD C16 in a DAW.
The only exception to this is if you use Cubase, as it allows Bluetooth MIDI control without installing the MIDI Berry and Loop MIDI apps.
It’s a shame it’s not plug-and-play, but it’s a minor hassle if you want to use the C16 wirelessly. Of course, you can alternatively plug the C16 directly into your PC with USB and not have to worry about any of this.
I did notice slight latency when using the C16 wirelessly compared to wired. The latency was small enough not to bother me during jamming.
Note:Â I saw a reviewer on YouTube who experienced latency in both wireless and wired modes on the C16. He compared the C16 to the Arturia MiniLab 3 and estimated that the latency of the C16 was around 30ms. I could not replicate any of this in my testing. While I did notice some latency when using the C16 wirelessly, the latency was removed when I plugged the C16 in. I also have a MiniLab 3 and the difference between playing the pads on the C16 wirelessly and the MiniLab 3 was definitely nowhere near 30ms (I estimate it was less than 10ms). 30ms is an exceedingly annoying amount of latency, so I suspect something must be wrong with his C16 or some other issue with his setup.
Using USB
Compared to using Wireless, connecting with USB is as simple as you would expect it to be. Just plug in the supplied USB-C cable and select the TempoPAD C16 in your DAW as the input device.
Using MIDI
If you have MIDI devices you want to connect to the C16, you can connect to them using the supplied 3.5 to 5-pin MIDI adapters.
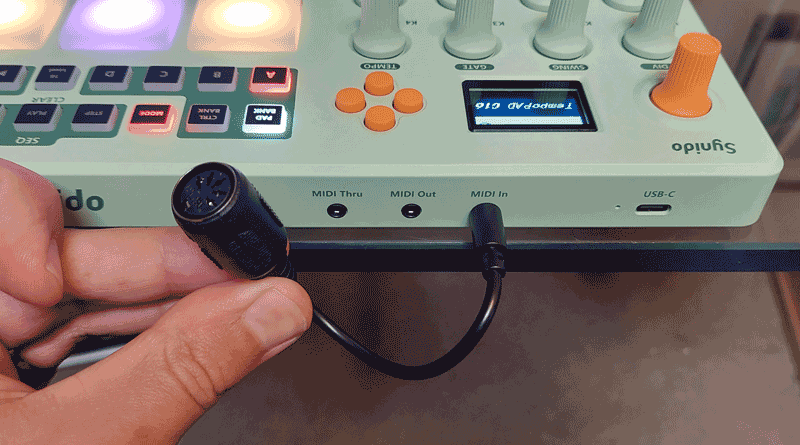
Three of these MIDI adapters are supplied with the C16, so you can use MIDI In, Out, and Thru.
Using the Pads in Keyboard Mode
The main focus of the C16 is the 16 velocity/pressure-sensitive pads.
I really enjoyed using the 8 pads on the TempoKEY W25, so I was looking forward to playing with a pad-focused controller.
Pressing the MODE button alternates between Keyboard mode and Custom mode (covered later). Keyboard mode lights the pads up to be used like notes on a keyboard.
The orange pads are for the natural notes (eg: C) and the pink pads for accidentals (eg: C#).
I’ve labelled the notes in the photo below to make this clearer:
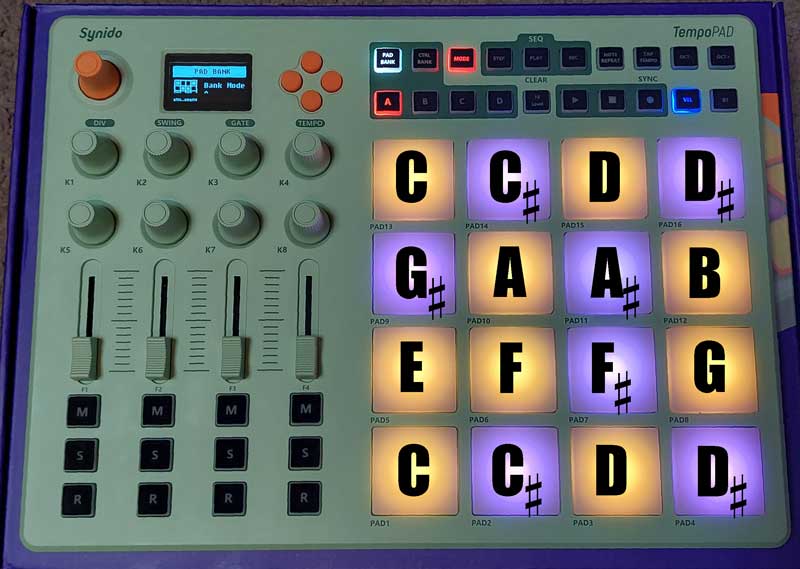
So you have just over a full octave worth of notes on the pads. You can shift the pads up or down using the OCT- and OCT+ buttons. The pads can be shifted four octaves down or up to give you a range from C0 to D#9. Keep in mind that all of this can be customized in the custom mode, so you have some flexibility to change this.
I’ve never played on pads before like this, so there was a slight learning curve getting used to the note layout compared to a typical keyboard. But it didn’t take long to figure out chord and melody patterns that I would normally play on the piano. While the TempoKEY W25 will suit musicians who are already used to playing music on a keyboard, it’s quite comfortable playing melodies and chords on pads once you build confidence in the new patterns and chord shapes.
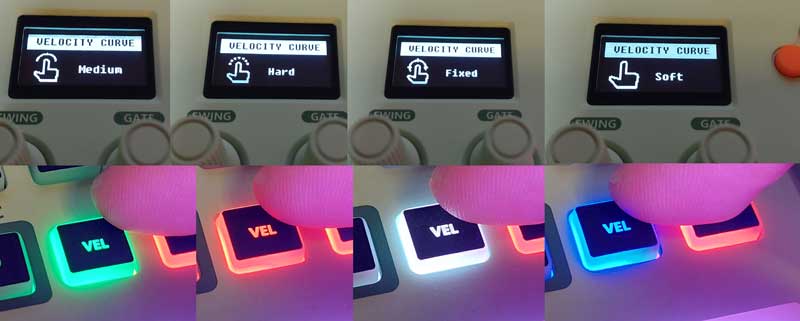
Pressing the VEL button changes the velocity sensitivity of the pads to one of four different preset options (soft, medium, hard, fixed). The VELOCITY TYPES button even features color-coded lighting, allowing you to easily identify the current setting (white: fixed, blue: soft, green: medium, red: hard).
Â
Being able to set the pads to a specific velocity mode makes the pads extremely versatile. It’s surprising how different the pads can feel to play when you change to different sensitivity profiles.
The main takeaway I had from using the Keyboard mode is that it’s a perfectly fine substitute for actual piano-like keys when you want to lay down some melodies or chords. It’s not as good as using keys, but it works perfectly fine.
Using the Pads in Custom Mode
The custom pad mode is where the C16 truly shines. In this mode (pressing the MODE button), you have four banks of completely customizable pads.
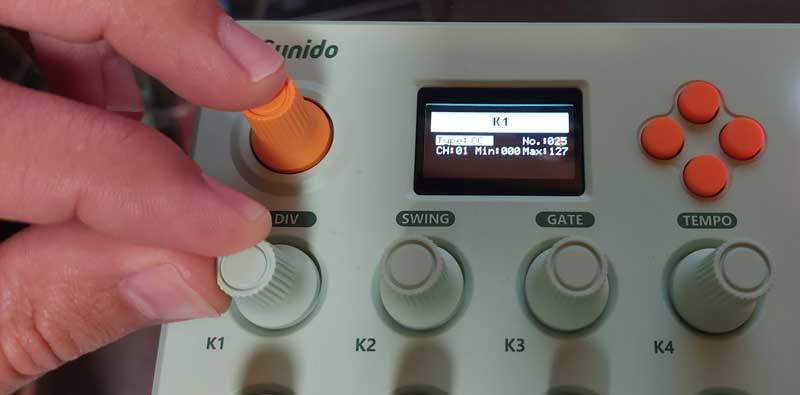
To change the settings for any pad, simply hold down the orange knob, then tap the pad you want to customize:

You’re able to customize the following settings for any pad using the orange buttons to navigate the options:
- Type: note, CC, PC
- Channel
- Note/CC/PC value
- Trigger (for CC): momentary or toggle
- Pad color: 16 different colors (or off)
Once you finish editing the pad settings, simply press the orange knob to save.
This ability to change all the pads to any settings you want (as well as the knobs, faders, and buttons as covered later), gives you so much flexibility with how you use the C16.
For example, I have a saved pad bank that is customized to control all the effects and presets used in TONEX and AmpliTube 5 in my DAW. This meant I could simply tap different pads to change between amp models, turn effects on/off, or switch to completely different plugins mid-song.
As another example, you could use the C16 in a live performance to play samples or electronic parts. If you have a song that plays a few piano notes, instead of bringing a keyboard to your gig, you could simply assign those notes to some pads and pair it wirelessly with a mobile device set up with a virtual instrument or sample player.
Part of the reason why pad-based controllers are so popular is due to this flexibility in how you can customize them to do anything you want.
There’s also a dark mode (hold down the MODE button) that lights up all the pads so they’re easier to see at night or on stage.
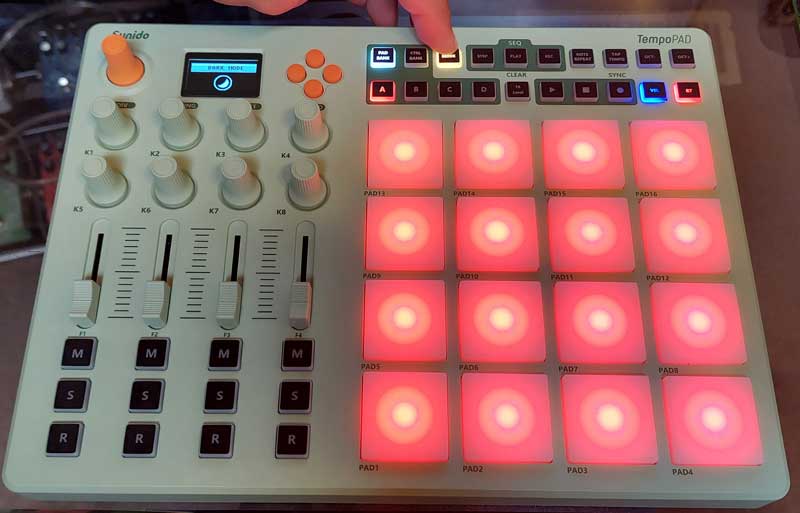
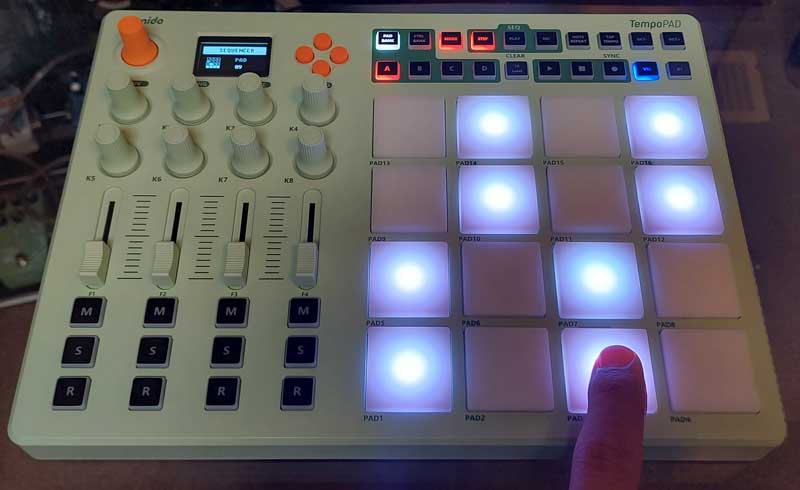
Note: the circles you see on the pads in the above photo aren’t there in person. This is only due to my camera. The pads are bright, so they don’t show up quite right on camera. In person, they’re more evenly lit (not completely even).
I feel the pads in the C16 are very well thought out and they feel great to use.
Assignable Knobs, Faders, and Buttons
On the left side of the controller are four columns of knobs, faders, and buttons. Every one of these can be customized in the same way the pads can be customized.
Hold down the orange knob, then move a knob/fader/button to change the settings:
For example, you can set a fader to control something in your DAW such as volume, pan, or any other parameter in a plugin.
The M S R buttons can be used for Mute, Solo, Record across four tracks, or you can assign them to control any other parameter or feature in either toggle or momentary mode.
The screen shows you exactly what information is being sent via MIDI every time you move a knob/fader/button, so it’s not too hard to keep track of what your custom settings are.
It’s worth mentioning that there are four control banks, so you can save custom settings for up to 32 knobs, 16 faders, and 48 buttons.
Step Sequencer
The big advantage of using a pad-based controller is the sequencer. Having 16 pads means you can program up to 16 steps in the sequence.
Pressing the STEP button under the SEQ heading switches the pads to sequencer mode:
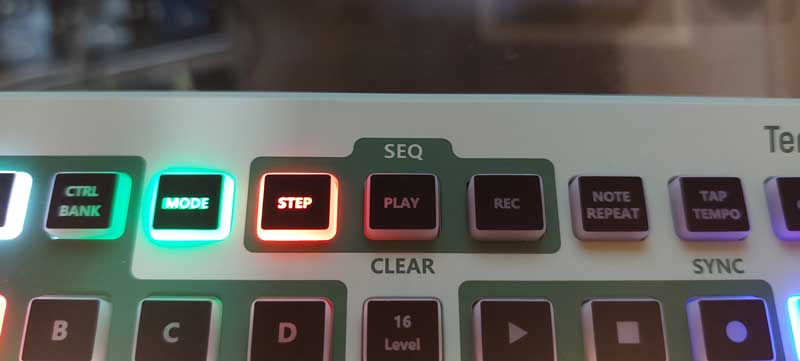
The tempo of the sequencer can be adjusted with the TAP TEMPO button.
To program the sequencer, you simply tap the pads on or off to make the pattern you want. Hit the PLAY button to start the sequencer. Even if you’ve never used a sequencer before, it feels easy to learn how to program on the C16.
What impressed me with the C16 is that you can actually program up to 16 sequencers at once. This means you can use the C16 to program patterns for multiple instruments (eg: bass drum on track 1, snare drum on track 2, etc.).
Hold down the STEP button for a second, then tap any of the pads to switch to that pad’s sequencer track.
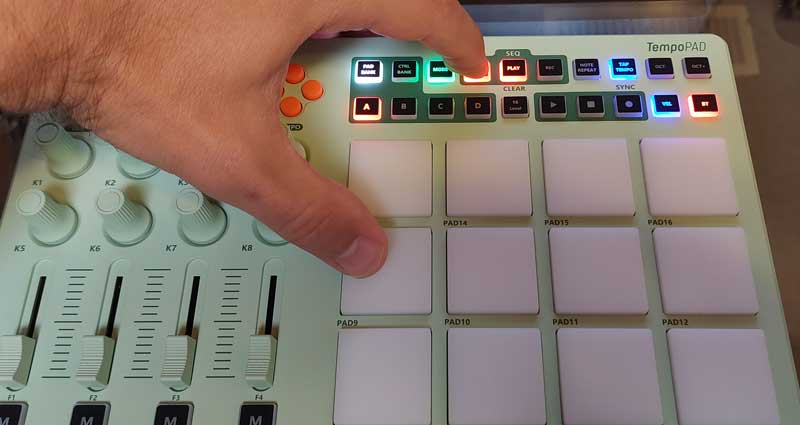
In the above photo, I’m holding down the SEQ button, then after a second, I press PAD9 to edit the sequencer on track 9. The screen will show you the currently selected pad track as well as a graphic showing which tracks currently have sequencer parts programmed:
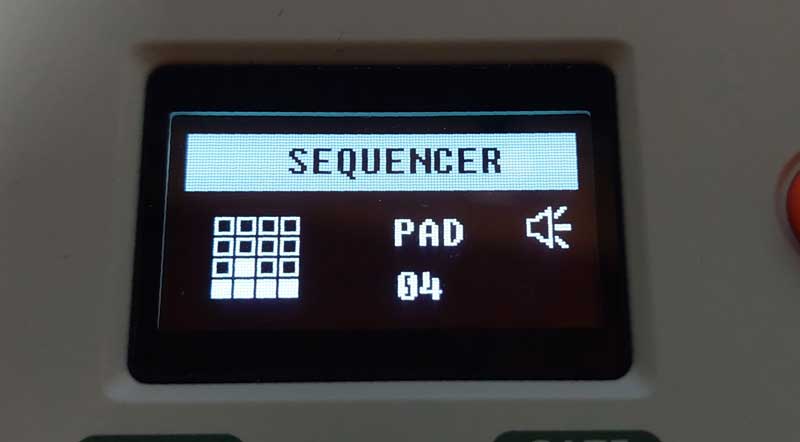
In the above photo, the diagram on the left shows the 16-pad grid. You can see that I have programmed parts for pad tracks 1, 2, 3, 4, and 6. All the other tracks are empty. The screen also shows that I’m currently editing PAD 4. The speaker symbol shows that the sequencer is currently playing. I really like that you can easily see on the screen at all times which tracks have parts programmed and which tracks are empty.
Each sequencer track uses a different color on the pads, which makes it easier to tell which track you’re on once you start to memorize the colors used (a color screen would make this more useful).
There are no inbuilt patterns or extra sequencer features on the C16 that you may find on more expensive sequencer units. Instead, the C16 gives you a very straightforward and easy-to-use sequencer.
Pressing the REC button allows you to record sequencer parts live instead of pre-programming them.
In the recording mode, you tap the pad you want to record (eg: bass drum on pad 1) to record the pattern for that track. For example, let’s say I want to record a hi-hat pattern on track 3. I hit record, then tap the pattern I want to record on PAD 3.
Press REC again to stop recording. After recording, when I go into PAD 3’s sequencer, I can see the pattern I recorded:
Here, I can edit the pattern I recorded or fix any timing mistakes in my recording (like the mistake on PAD 4).
The recording mode is great if you want to quickly get multiple track ideas down at once, as you can easily record multiple tracks at a time.
The only downside I noticed when recording sequencer parts is that you have no visual indicator of the current beat, like you do in the play mode. The REC button blinks to the beat, but there’s no visual way to tell which beat in the sequence it’s on. So I recommend programming at least one track first, then you can use that track to help you work out what the current beat is in the sequence.
Synido TempoPAD C16 Overall Impression
Overall, the TempoPAD C16 packs in a great range of features, and most of those features are instantly accessible with one or two button presses. You don’t have to dig into menus to change settings and almost everything is only one button press away.
The pads are excellent and can be customized using a variety of pressure sensitivity profiles. You’re able to easily adjust the settings for every pad, fader, knob, and button in multiple banks, which gives an impressive range of options.
The wireless function works great, and it’s ideal for musicians wanting to use a controller with mobile devices or on the go.
It is disappointing that Windows users will need to install and use two third-party programs to be able to use wireless (unless you use Cubase). Mac and mobile users won’t have this issue.
I also like that the controller holds your settings when you turn it off. If you’ve been programming the sequencer, you can turn it off and come back to it the next day and continue without losing anything.
It took me a while to customize the pads, knobs, faders, and buttons to control the plugins and DAW settings I like. But once it was all customized to my liking, the C16 feels like the perfect extension of my DAW when I’m jamming or writing music (I’m currently using FL Studio as my main DAW). As the C16 is wireless, I can pick it up and take it over to my piano or drum kit and control the DAW from the other side of the room. It feels great to use.
Overall, the build quality is great for this price point. I’ve only used the unit for a month as of writing this review, so I’ll update this if I experience any reliability issues.
Check out the price and details of the Synido TempoPAD C16 on Amazon here.
Synido TempoPAD C16 Pros and Cons
Here are the main pros in my opinion of the TempoPAD C16:
- Wireless connection with minimal latency
- Easily accessible features with plenty of buttons
- Color-coded buttons
- Great feeling pads
- Ability to fully customize knobs, faders, buttons, and pads in multiple banks
- Basic sequencer works great
- Useful display
- Includes useful cables and a good-quality carry bag
Here are the main cons:
- Wireless for Windows users requires two third-party programs to work
- The sequencer record mode has no visual indicators when running
Overall, I’ve enjoyed using the C16 far more than any other MIDI Controller. The C16 will be my main controller for the foreseeable future because I’m that impressed by it.
Who is the Synido TempoPAD C16 for?
If you don’t already have a MIDI controller, I have no problem recommending the TempoPAD C16 to you. The range of features is great, and more importantly, it’s quick and easy to learn how to use it and customize it exactly to fit your needs.
If you want a controller that gives you more focus on rhythm playing, sequencers, or basic melody recording, the pad-based C16 works great. If you think you might want to focus more on chords and melody recording, a MIDI controller that includes keys like the TempoKEY W25 might suit you better.
There are many different types of MIDI controllers, and each type suits different musicians. Have a read through my Guide on MIDI Controllers here to learn more.
The post Synido TempoPAD C16 Wireless MIDI Controller Review appeared first on Guitar Gear Finder.
