
 TechToday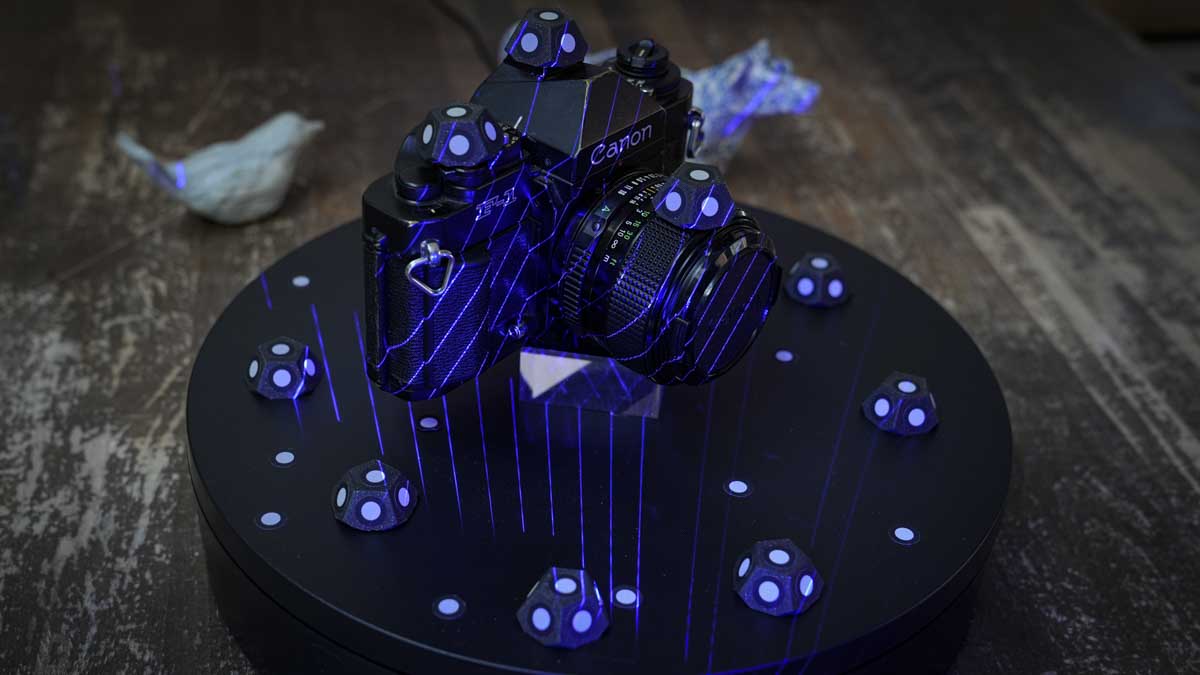
Why you can trust TechRadar
We spend hours testing every product or service we review, so you can be sure you’re buying the best. Find out more about how we test.
The Creality Sermoon P1 is a handheld 3D scanner and follows similar use lines to the superb Sermoon S1 that I looked at earlier in the year. However, unlike the S1, it can be used in isolation: no wires, no need for a computer; everything needed from the scan to the display is held within one small, portable box.
This includes the initial capture, point-cloud fusion, mesh creation, editing, and multi-scan merging, all of which can be handled on the device, which is impressive considering the amount of data being captured. Inside is an eight-core Qualcomm processor with 24GB of RAM and 256GB of storage, and the scans appear on a six-inch Full HD touchscreen.
The fact that everything is contained makes a difference to the user compared with wired models. When I reviewed the Sermon S1 earlier this year, the biggest limitation I had was the Y-cable connecting the S1 to the computer, especially when I knocked it mid-scan. As the P1 essentially has an onboard computer and no wires, this isn’t an issue.
Latest Videos FromTechRadar
Of course, this does mean that the P1 is heavier at 830g compared to the S1’s 508g, but shaped a little like an oversized game controller, the shape and extra weight really aren’t an issue when you have that freedom to walk around an object without watching out for the cable catching.
Compared with the Sermon S1, the P1 is a complete device with a scanner and screen that lets you see the scanning process without needing to be constantly connected to a computer or a power source.
There are essentially two scanning modes: blue laser with lines that sweep across the object to be scanned and require markers to be stuck to the object, and then IR for objects where markers can’t be stuck; the scanning quality is also a small step up from the S1, although through the test I’d say they were actually pretty much on a par.
Physically, the large game-controller design of the handset, with its two substantial grips, makes it easy to handle, and at 830g, it’s thankfully not to weighty. As the device is completely standalone, it’s powered by a swappable 3,300mAh battery, with the kit including two; each charges to 80% in 50 minutes.
As you scan, everything is shown on the touchscreen, which is bright and responsive. While the screen is glossy and does show reflections, they weren’t too much and remained easy to see throughout scanning.
Like the Sermon S1, the scanning technique was still the sticking point; it was a test. Again, preparation is important to give yourself a good chance of a decent scan, and pumping light into the screen is also key.
Using the blue lasers to scan, after the initial calibration, marker placement, lighting, and placing marker cubes around the object helped with getting a successful scan. So did elevating on transparent blocks, all helped with the success of the scan.
While having everything in the handset is a step forward, the most significant feature here, as with all scanners, is a slow, methodical approach.
Creality Sermoon P1: Price and Availability
The Sermoon P1 is available direct from Creality in the US for $3299, and in the UK, the Creality store has it in stock for £2799.
You can also pick up the 3D scanner along with bundled items such as an automatic turntable and scanning markers. Depending on your use-case and workflow, they’re well worth checking out.
Creality Sermoon P1: Design
The P1 features a compact, game controller-like body with a grip on either side and a large touchscreen. The weight is actually pretty modest at 830g, and it feels solid enough with its rubberised plastic exterior, which suggests it was designed for use out in the field as well as in the studio.
The six-inch touchscreen is where things really differ from the other handheld 3D scanners I’ve used, as it lets you control object scanning and editing without a computer connection. However, a data connection is still available if needed.

Handling the device around an object is easier than with the wired 3D scanner, and the grips make it easy to handle and manoeuvre, although I still find that using a turntable is the best solution.
One of the issues with a wireless handheld device is that the batteries will inevitably drain. Thankfully, Creality has designed this so the battery can be swapped out, with two pinch clips embedded in it that make it relatively easy to remove when needed. More importantly, they lock firmly into place so there is no possibility of the battery coming out at any point.
The feature that I was pleased to see, despite this being a handheld device, is the 1/-inch thread on the base. This means it will fit a rig if you have one and will actually make the whole scanning process far less painful for many objects. I also found that using a turntable is a must for higher-quality scans.
Creality Sermoon P1: Features

Specs

CPU: Qualcomm eight-core processor, up to 3.36GHz, with FPGA acceleration
Graphics: Adreno 740 GPU
RAM: 24GB LPDDR5X
Storage: 256GB UFS 4.0
Left Ports: USB-C
Connectivity: Wi-Fi 7, wired USB-C to PC, wireless PC scanning
Audio: Integrated speaker for onboard guidance
Camera: Four-lens scanning system with global-shutter RGB colour camera
Size: 209 x 129 x 53mm
Weight: 830g
OS Installed: Creality onboard scanning and mesh-processing software; companion software for Windows and macOS
Display: Six-inch Full HD touchscreen, 160-degree viewing angle
Battery: Two hot-swappable 3,300mAh batteries, 65W PD 3.0, 80% in 50 minutes
Scanning technologies: 22 cross blue laser lines, seven parallel lines, single blue line, dual NIR VCSEL
Claimed accuracy: Up to 0.02mm laser, up to 0.075mm NIR
Volumetric accuracy: 0.02mm + 0.06mm/m
3D resolution: 0.05- 2 mm blue laser, 0.1- 2 mm NIR
Scan volume: 5 x 5 x 5mm up to 4,000 x 4,000 x 4,000mm
Maximum speed: Up to 60fps standalone, 100fps connected to a PC
A big feature of this and several other Creality 3D scanners is the dual light source, which enables different scanning technologies to be used depending on what you’re scanning.
The blue lasers, which are my preferred method of scanning, handle precise geometry. At the same time, dual NIR VCSEL projectors cover larger or more organic subjects, and the scanner switches between them rather than just using one.
As with the S1, there are three blue-laser modes that you can use to cover different types of jobs. The most common object, and the one to start with, is the 22 crossed lines that enable you to scan-sweep large surfaces quickly. Then there are the 7 parallel lines that capture more detailed features. Finally, there’s the single line, which can be used to probe deep into scanning holes, gaps, and recesses. Creality quotes a depth-to-diameter ratio of up to 5:1, tested on a 29.08mm pipe at a depth of 152.31mm; in the test, this was enough to reach the bottom of the coffee cup without issue.
Two features change from the Creality Sermoon S1 I reviewed. The fast mode drops from 34 crossed lines to 22, while volumetric accuracy improves from 0.02mm + 0.08mm/m to 0.02mm + 0.06mm/m. Fewer lines with better-stated accuracy should mean that the wider field of view is doing the work
The fact that the P1 has been designed as a standalone device means that all 3D scanning and modelling is processed internally.
When I first got started with the P1, I had to run through a similar calibration process that takes between 5 and 10 minutes, and during the test I found that it was best to recalibrate at each new location.
In use, its small internal eight-core Qualcomm processor, Adreno 740 graphics with FPGA acceleration, 24GB of memory, and 256GB of storage enable capture, point-cloud fusion, mesh editing, and multi-scan merging, all running on the device.
If you do want to connect to a PC, you still can with three options: wireless or wired PC, with Wi-Fi 7 handling the wireless link.
Alongside the 3D scanning, surface texture is captured using a global-shutter RGB camera and 12 white LEDs, which together record surface colour.
If you have used 3D scanners before, you’ll be used to scanning spray. Here, Creality states that blue-laser modes capture dark and metallic surfaces without requiring a spray scan. However, some reflective surfaces will still benefit.
Creality Sermoon P1: Performance

The Sermoon P1 arrives in a semi-hard case rather than the plastic waterproof cases that I’ve seen with previous Creality 3D scanners, which is a bit of a shame in some respects. However, it still keeps everything neatly packed in one case and, of course, offers protection during transport.
Before getting started, the 3D scanner needs to be calibrated. For some, this process will be fast and straightforward, while for others, adjusting the angle and moving the scanner up and down to align with the points on the 6-inch screen can be surprisingly challenging.
For the glass calibration chart, place it flat on the table and follow the on-screen instructions, such as aligning the markers by repositioning the handset. The first run of this takes some time and can be tricky; however, as I found during the test, regular recalibration is a good idea, and the more often you calibrate, the quicker it becomes.
Once calibration is complete, you can start scanning. I’ve found that starting with small objects is always the best place to begin, then gradually increase as your familiarity with the scanning process improves. I’ll also point out that 3D scanning is a skill, not something that you can just do out of the box. The first 10 attempts will more than likely be a disaster.
From experience, I know that a methodical approach works, and diving in headfirst almost always ends up in disaster. However, diving in headfirst is exactly where I decided to start, and with the first scan of whatever came to hand, I selected Infrared. I also just left it on the desk next to me and started the process.
Usually, this would be an instant fail; however, I was surprised that, on the first pass, the quality was usable, though not perfect. With a bit of mesh fixing and filling the hole in the bottom of the mesh, I’d managed quite a decent scan that would be perfectly printable on the K2.
I then noted at the bottom of the screen the “Colour Mapping”; clicking this, the texture from the mug was applied, which was even more impressive. What the scan and application of the mapping showed was that the light levels were a little low, so the graphics of the print looked duller than I would have liked – a good place to start, with the Original PRUSA INDX waiting in the wings for a full test.
I switched to the blue lasers, then grabbed the Chilli water bottle and covered it with markers. This didn’t go so well, and try as I might, I just couldn’t get a scan. This was also surprising as it’s usually the other way round.
However, this is where the methodical approach comes in: placing marker blocks around the bottle, elevating it onto transparent blocks, and placing it on a turntable with decent lighting suddenly showed what was actually possible.
I then selected a range of smaller objects and used the Infrared and Blue lasers to scan, switching between the line mode in the Blue Laser and the Object type in the Infrared.
The first point about the scanning process is that this is far easier to handle than the Sermoon S1 that I had looked at previously, and while it still takes some skill, I’m at about 50% after a few months’ practice; this design definitely makes things easier, although still not quite perfect.
The screen’s scan quality looked excellent, and what I really liked was the in-Studio workflow. Essentially, after scanning a few objects, I sat back in the studio, ready to download the models, which I expected would be a bit of a process.
However, using the provided USB cable, I plugged it into my MacBook Pro M1 Max, clicked through the usual authorisations, and loaded CrealityScan. When I plugged it in, I got the option to choose between Data Sharing and Scan Connection. You can then connect and share the files to the desktop software.
During the test on the Mac, the wired connection didn’t seem to work at all; however, it worked smoothly on the PC, whereas the Wi-Fi connection was straightforward, although you do need to switch your computer’s Wi-Fi connection to the Wi-Fi hotspot of the Sermoon P1 even if both devices are connected to the same wireless network.
Checking over the scan, for the majority of objects, while there is some smoothing of finer textures, the detail is surprisingly good. What really stands out is the dimensions of the objects scanned; they remain one-to-one, so you get an exact scale match to whatever you’re scanning.
I also really like the texture mapping; with the filament-mixing features of the latest multi-tool 3D printers, it suddenly becomes especially interesting. Although I haven’t as yet had much success, the potential here is massive.
Once again, the main issue I had was with the tracking, and despite having plenty of markers around and over the object, I had to be focused and methodical with the scans to get the results I expected. Again, practice is needed.
There were also times when the blue light scan would just lose the object or report not enough markers, even when things were covered.

What I really liked about the Yuse, however, was the fact that everything is in one place and in a far more portable form. The fact that you can take two scans of an object and blend them on-site quickly makes a massive difference.
Again, the frame rate and scanning techniques really come into play with many objects, and the auto-switching of scanning modes didn’t tend to deliver exactly what I expected; it was only my prior knowledge that enabled me to get the decent scans I wanted for this review.
What I will say is that, while Creality has worked on the user guide, it’s still a little clunky; a better getting-started guide is definitely needed, as the potential of these machines is now massive.
At the start of the test one of my big worries was that the internal processing was going to be slow, but actually from the scanning to editing the speed is actually pretty decent, there are some pauses in the scanning, which I get from the desktop version as well, but the process is quite smooth and this is a big step forward for the technology but also the ease of scanning.
Creality Sermoon P1: Final verdict

The Sermoon P1 is a step forward in 3D scanning technology, and after some time spent mainly practising the techniques, I am impressed by its capabilities. The initial scans showed a flip in the ease of scanning wth trhe different techniques. Infrared, which I usually fail to scan with any real success, worked well, whereas I had initial issues with the Fine blue-laser modes.
However, stepping back and being more methodical about the process again yielded the results I expected, and what impressed me was the speed of the onboard processing and the scanner’s flexibility, which didn’t require a direct connection to a machine. This also made it easier to scan in various places.
As I looked through the scans, the quality can be excellent, but this really depends on you and the time you put into it. When I reviewed the Creality Sermoon S1, the verdict came down to a steep learning curve, and the P1 does circumvent some of the issues that I had with that scanner.
The cable and the laptop are essentially gone, unless you need them. When it comes to the calibration, marker placement, lighting and coverage, all remain much the same.
The Sermoon P1 really does make sense if you’re moving between the workshop and a client’s site where setting up a tethered rig takes more time than the scanning itself. The purchase price once again keeps it out of hobbyists’ hands, but as the technology advances, this will, of course, change.
As it is, if you put in the time and take things step by step, this has huge potential.
Should you buy the Creality Sermoon P1?
| Row 0 – Cell 0 | Row 0 – Cell 1 | Row 0 – Cell 2 |
|
Value: |
Professional capability at a professional price, with a cheaper sibling close behind |
4 |
|
Design: |
Exceptional hybrid scanning and a genuinely standalone workflow |
5 |
|
Features: |
Fast and stable in use, pending full measured results |
4.5 |
|
Performance: |
Impressive when the preparation process is right. Steep learning curve, but results improve with practice. |
4.5 |
|
Total: |
The most self-contained scanner at this level |
4.5 |
Buy it if…
Don’t buy it if…
For more crafting essentials, I’ve also tested out the best 3D printers and best laser engravers
The post Creality Sermoon P1 3D scanner review first appeared on TechToday.

 Ecoustics
 Why is being a Zodi so bad
 Female Original
 January Girl